Assembling the Power Unit:
- Securely fasten four 5/16″ x 1-1/4″ bolts into the top and bottom holes of the mounting bracket using 5/16″ plain nuts.
- Position the power unit onto these bolts and lock in place with 5/16″ nylon insert nuts.
Hydraulic Repair Near Me Hydraulic System Guidelines:
- Caution with Teflon Tape: Ensure the Teflon tape begins no closer than 1/8” from the end of the hydraulic fitting. Incorrect application can harm the hydraulic system.
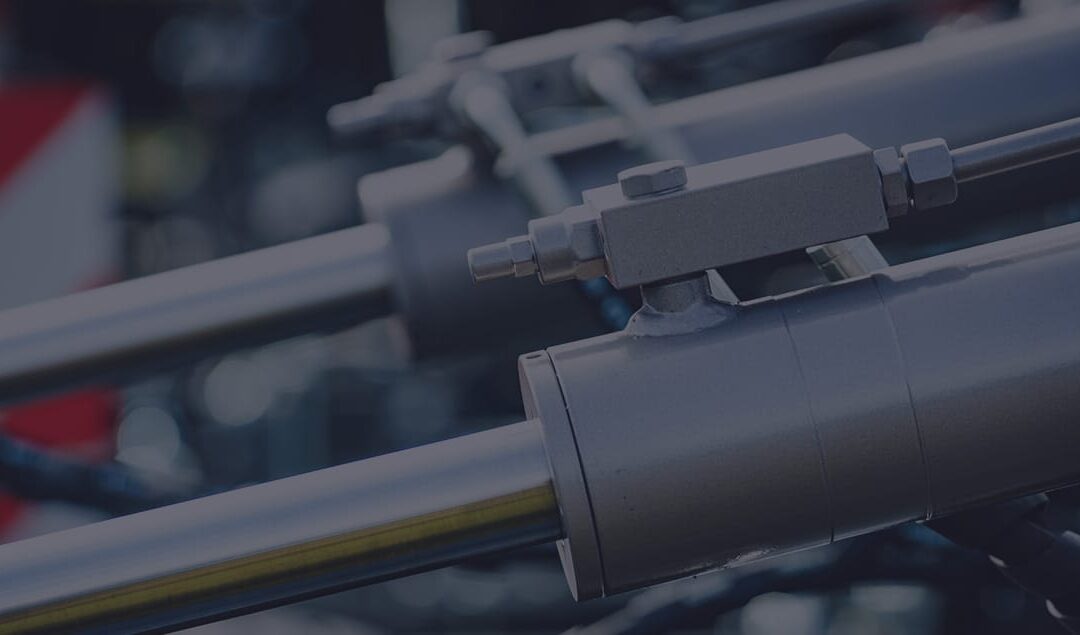
- Flared (JIC) Fittings Caution:
- Only use wrenches of the correct size.
- Only the nut part of the fitting should move when tightened. The flare seat must remain stationary.
- Initially, hand-tighten the fittings.
- Tighten the nut of the fitting by 2-1/2 hex flats with the appropriate wrench.
- Loosen the fitting by one full turn.
- Re-tighten by hand, then turn the nut by 2-1/2 hex flats again.
- Attach the o-ring elbow to the open port on the power unit’s right side, with the open end facing downwards.
- Hand-tighten one end of the shortest Hydraulic Repair Near Me hydraulic hose to the mainside cylinder fitting.
- Connect the other end of this hose to the power unit fitting.
- Hand-tighten the longest hose between the two cylinders.
- Filling with Fluid:
- Open the fill level screw near the top of the Hydraulic Repair Near Me power unit tank.
- Fill the tank with Dexron III ATF or ISO-32 petroleum-based hydraulic oil (non-foaming, non-detergent) until it reaches the bottom of the screw hole.
- Replace the screw and tank breather.
Electrical Installation:
- Single Phase Setup:
- Engage a certified Hydraulic Repair Near Me electrician to set up a 208-230V, single-phase, 60 Hz power supply with a 20 amp time delay fuse.
- Allocate separate circuits for each power unit.
- Note: Single-phase motors require modifications for 50 Hz. power lines.
- Three Phase Setup:
- Have a certified Hydraulic Repair Near Me electrician establish the correct power supply.
- Use individual circuits for each power unit.
- Motor Operation Data:
- Running Motor Time Delay
- 208-240V 50/60Hz, Voltage Range 197-253V, Fuse Size 20 Amp
- 400V 50Hz, Voltage Range 360-440V, Fuse Size 10 Amp
- 440-480V 50/60Hz, Voltage Range 396-528V, Fuse Size 10 Amp
- 575V 60Hz, Voltage Range 518-32V, Fuse Size 10 Amp
- Running Motor Time Delay
- The motor rotates counter-clockwise.
- Refer to Wiring Diagram / Instructions for installation.
Bleeding the Hydraulic System:
- Loosen the hose connections at the cylinder fittings but not the fittings themselves.
- Activate the power unit until fluid emerges at the mainside cylinder port, then secure that hose connection.
- Continue running the unit until fluid appears at the offside cylinder port without any air. Tighten this connection.
- Lower the lift to the ground, disengaging any safety latches if necessary.
- E. Replenish fluid in the Hydraulic Repair Near Me system as outlined earlier.
Assembly of Arms and Restraint Mechanisms:
- Start by installing the restraint gears as indicated in Figure 10.
- Align the gears marked ‘TOP’ against the arms’ bottom as shown in Figure 14, and attach them using two 3/8-16NC x 1-1/2 inch long HHCS. Leave these bolts loose for now.
- Place the restraint pawls on the carriage so they engage with the arm gears.
- Insert the swing arms and swing arm pins. Position longer arms at the rear or drive-in side, and shorter arms at the front (refer to Figure 2). Note: It might be necessary to lift the restraint actuator pin to fit the swing arm pin.
- Secure the gear bolts with a torque of 30-34 ft-lbs.
- Apply heavy-duty bearing grease to the inner corners of both legs.
Final Adjustment Steps:
- In case of issues, halt further steps and consult the Troubleshooting section in the Owner’s Manual.
- Elevate the lift to its maximum height, then lower it onto the safety latches. Lift the carriages, withdraw both latch pull rods, and lower the lift to the ground.
- With no load, raise and lower the lift three times to expel any remaining air from the hydraulic system.
- The latches should audibly click as the lift ascends.
- Ensure neither pull rod can be extracted when the carriages rest on the locks.
- For the first vehicle lift, elevate it no more than three feet, lower onto the safety latches, raise slightly, pull out both latch pull rods, then lower the vehicle to the ground.
- Lift the vehicle to full height, set the carriages on the safety latches, then lower to the ground.
- H. After using the lift with a vehicle ten times, re-tighten the anchors to a minimum of 90 ft-lbs.
SAFETY
Adopting a preventive maintenance strategy for hydraulic hoses offers several key benefits:
Extending the Service Life of Hydraulic Hoses:
Preventive maintenance ensures Hydraulic Repair Near Me hydraulic hoses remain in optimal condition, contrasting with reactive maintenance, which often shortens their service life. Regular use causes wear and tear on hydraulic system components, and delaying repairs until after damage has occurred usually results in less effective repairs. Routine inspections and maintenance activities help in early identification and correction of issues such as leaks, thereby disrupting the usual progression of wear that leads to hydraulic leaks and extending the period before replacements or upgrades are needed.
Reducing Maintenance Costs:
The cost of emergency repairs can be three to nine times higher than that of planned preventive maintenance, making it an important consideration in financial management. Reactive maintenance typically involves multiple charges for emergency service, whereas a single session of preventive maintenance can resolve multiple issues. Furthermore, preventive maintenance mitigates the risk of cost fluctuations due to inflation through the bulk purchase of parts at fixed prices. It also cuts down on the transportation expenses incurred when equipment must be transported for off-site emergency repairs.
Decreasing Unplanned Downtime:
Predictive maintenance has been shown to decrease downtime by 45% and the likelihood of equipment breakdowns by 75%. This method emphasizes monitoring the mean time between failures (MTBF), a crucial metric in many industries for informed maintenance decision-making. By scheduling maintenance activities, businesses can plan these events to coincide with less busy periods, thereby minimizing their impact on regular operations.